DIY Wire Headband
 Hey guys! Today I'm going to show you how to make your very own wire headband. They're super cute, super easy to make, and the wire makes them defy the rule of headscarves/headbands. Which is to say, they actually stay on your head! Yesssssss!
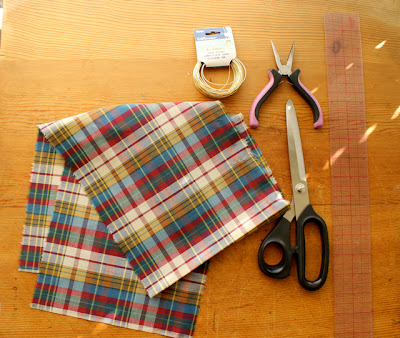 Grab yo-self some supplies!
- About 1/4 yard of the fabric of your choosing
- A sewing ruler
- Scissors
- 20 gauge wire
- Needle nose pliers
- A sewing machine threaded with matching thread!
First, cut that fabric! You'll want a strip that's about 4.5" wide (so when you fold it and sew it, you'll end up with a 2" wide headband) and 32" long. You can cut it, or you can make a snip and rip to get the strip you need.
Next, cut a length of wire that's about 36". You want it to be the length of the headband, plus a few inches on either end.
Bring your fabric over to the sewing machine and fold it in half hot dog style, aka: so the long edges meet. What? That Kindergarten folding term stuck with me, ok?
Starting about an inch from the center, sew towards one end of the strip of fabric, leaving 1/4" seam allowance.
When you get 2"-3" away from the end of the strip of fabric, gradually begin sewing towards the center fold, meeting it 1/4" from the end of your fabric strip.
Then, cut the curve down, leaving 1/4" seam allowance.
Grab yo-self some supplies!
- About 1/4 yard of the fabric of your choosing
- A sewing ruler
- Scissors
- 20 gauge wire
- Needle nose pliers
- A sewing machine threaded with matching thread!
First, cut that fabric! You'll want a strip that's about 4.5" wide (so when you fold it and sew it, you'll end up with a 2" wide headband) and 32" long. You can cut it, or you can make a snip and rip to get the strip you need.
Next, cut a length of wire that's about 36". You want it to be the length of the headband, plus a few inches on either end.
Bring your fabric over to the sewing machine and fold it in half hot dog style, aka: so the long edges meet. What? That Kindergarten folding term stuck with me, ok?
Starting about an inch from the center, sew towards one end of the strip of fabric, leaving 1/4" seam allowance.
When you get 2"-3" away from the end of the strip of fabric, gradually begin sewing towards the center fold, meeting it 1/4" from the end of your fabric strip.
Then, cut the curve down, leaving 1/4" seam allowance.
Repeat the last 3 steps, being sure to leave about a 2" hole at the center of the folded strip.
Once that's complete, turn everything right side out! You should be able to get the corners out pretty easily with a bit of wiggling.
If you would like to, you can press everything at this point. Honestly, I didn't feel like going down to the basement to iron mine, so I skipped that step! Laziness for the win!
Grab your wire, and make a loop at either end. Twist the tail around the wire to keep it in place, and use your pliers to bend the ends in such a way that they won't poke ya!
Insert the wire into the strip of fabric through the hole you left open, and adjust until the loops have reached their respective ends of the strip of fabric.
Now, this next step is completely optional. It kind of drives me nuts when I wear wire headbands and after a while, the wire gets all twisted and pulls away from the ends. To avoid that, I pulled the loops up against the seam allowances at the ends of the strip and did a quick stitch inside the loop. This holds it in place by permanently sandwiching the wire between that stitch and the seam allowance, so it doesn't get quite so twisty.
The downside, is that you will have a visible stitch on your headband, but if you use thread that matches (unlike what this lady did...), then it should be hardly noticeable!
Last, you'll want to close the hole you left open on your wire headband. You can do this either by doing an edgestitch if you don't mind the stitching being visible, or by hand stitching it closed.
Once you're done, pop that sucker on and check out how cute you look!
I love these wire headbands because they're quick to make, stay on reallllly well, and don't even require any tying. Just pull it up, twist the ends, and you're good to go!
I hope you enjoyed following along with this tutorial and use it to make yourself lots of pretty wire headbands!


Δεν υπάρχουν σχόλια:
Δημοσίευση σχολίου